
Sauces & Condiments
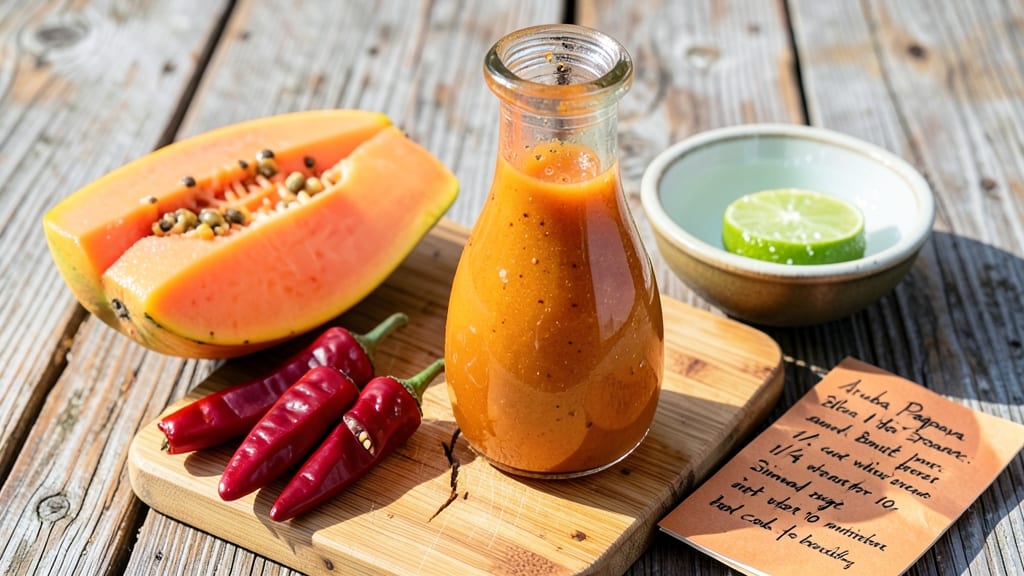
This Aruba papaya hot sauce transforms the island's signature fruit into a fiery, tropical condiment that balances sweetness with heat. 🌶️ The secret lies in fermenting fresh papaya with Scotch bonnet peppers—Aruba's fiery chili—to create a sauce that's both complex and approachable, perfect for seafood, grilled meats, or dipping.
Unlike store-bought versions, this recipe captures the island's citrusy brightness while delivering controlled, vibrant heat.
The process begins with a simple fermentation of papaya and peppers in vinegar, which develops depth over time. I've adjusted the heat level to be medium-hot (3,000-5,000 Scoville units), making it versatile for those who want flavor without overwhelming spice.
The key is blending the fermented mixture with pineapple juice and lime, which enhances the tropical fruit notes while balancing the heat.
What you'll end up with is a glossy, amber sauce that's rich in umami from the fermentation and bright from the citrus. The papaya's natural sweetness shines through, while the Scotch bonnet peppers add a lingering, fruity heat that's far more complex than traditional hot sauces.
This isn't just a condiment—it's a flavor experience that brings Aruba's tropical vibes to your table.
Store it in the refrigerator for up to 3 months, where the flavors continue to meld and develop. Use it to elevate tacos, grilled shrimp, or even drizzle it over fresh fruit for a sweet-spicy contrast. Here's how to make it—step by step.
Ingredients for aruba papaya hot sauce
Nine ingredients transform tropical flavors into a vibrant, medium-hot sauce perfect for seafood and grilled dishes.
| Ingredient | Amount | Notes |
|---|---|---|
| Fresh Papaya 🍈 | 2 cups | Ripe, seeded, diced small |
| Scotch Bonnet Peppers 🌶️ | 4 whole | Seeds removed for medium heat |
| White Vinegar 💧 | 1 cup | Distilled preferred for clarity |
| Pineapple Juice 🍍 | ½ cup | Freshly squeezed for brightness |
| Fresh Lime Juice 🍋 | ¼ cup | Strained for pulp-free sauce |
| Granulated Sugar 🍚 | ¼ cup | Balances acidity and heat |
| Garlic Cloves 🧄 | 2 cloves | Minced for aromatic depth |
| Salt 🧂 | 1 tsp | Diamond Crystal preferred |
| Cayenne Pepper 🌶️ | ½ tsp | Adjust for additional heat |
| Extra-Virgin Olive Oil 🫒 | 1 tbsp | For glossy finish and richness |
Papaya is the heart of this sauce—ripe but not mushy, with seeds removed for smooth texture. Trader Joe's or Latin markets often carry the best quality, but any grocery store papaya works if it's vibrant orange-yellow. Scotch bonnet peppers are non-negotiable for that authentic Aruban heat, but if you can't find them, habanero peppers are the closest substitute. The vinegar should be white and distilled—apple cider vinegar can add unwanted sweetness. For pineapple juice, fresh is ideal, but store-bought 100% pineapple juice (like Tropicana) works in a pinch. The lime juice should be freshly squeezed—bottled just doesn't cut it here.
No Scotch bonnet peppers? Habanero or ghost pepper will give you similar heat, but taste the sauce as you go—you can always add more vinegar to mellow it out. Short on lime juice? Key lime juice or even lemon juice works, though the flavor will shift slightly. The sugar is crucial—it balances the acidity and heat, so don't skip it. For a smoother sauce, strain the mixture through a fine-mesh sieve after blending. If you want extra umami, add a 1/4 tsp of fish sauce (though this makes it non-vegan). The olive oil at the end isn't just for richness—it adds a silky texture that makes the sauce cling beautifully to food.
This sauce develops best over time—flavors meld for 2-3 days in the fridge before reaching peak deliciousness. Store in an airtight glass jar with a tight seal, and it'll keep for up to 3 months in the refrigerator. The longer it sits, the more complex the flavors become. For gifting, use small amber or cobalt glass bottles—they look stunning on a shelf and protect the sauce from light. If you make a big batch, freeze half in ice cube trays for single-serving portions. Trust me, you'll want to drizzle this on everything from tacos to grilled shrimp.
Why You'll Love This Recipe
- No Blender Needed: I swear by this—just a knife, a bowl, and a little elbow grease. That ripe papaya and Scotch bonnet blend into a smooth, fiery paste with no pulsing required. (Honestly, my blender’s still covered in last week’s salsa.)
- Sweet Heat Balance: The pineapple juice and lime cut that Scotch bonnet’s punch just right—bright, tangy, and addictive. It’s not overpowering; it’s the kind of heat you’ll chase with another bite, not water.
- Pantry Stash Magic: This sauce keeps for weeks in the fridge, so I make a big batch and use it like ketchup. Drizzle it on grilled fish, toss it in ceviche, or even mix it into marinades—it’s my secret weapon for lazy nights.
- Budget Brightener: Papaya’s cheap in season, and vinegar stretches the flavor without breaking the bank. Between us, I’ve made three batches already this month, and I’m still finding new ways to use the leftovers. (Yes, even on a Tuesday night.)
Step-by-step instructions for Aruba papaya hot sauce
Here's how to blend tropical fruit sweetness with fiery heat for a sauce that's as vibrant as Aruba's shores.
🍳 Step 1: Build the Flavor Base with Papaya and Vinegar
Combine the 2 cups of diced fresh papaya, 1 cup of white vinegar, and 0.5 cup of pineapple juice in a medium saucepan. This tropical trio forms the vibrant foundation of our sauce. Bring the mixture to a gentle simmer over medium heat, then reduce to low heat and let it cook uncovered for 10-12 minutes. You'll notice the papaya softens and the liquid reduces slightly—this concentrates the flavors and removes excess moisture that would dilute our hot sauce.
Here's the thing—I like to stir occasionally but not constantly. The papaya releases its natural juices and sweetness into the vinegar, creating a bright, tangy base. If you see any foam forming on top, simply skim it off with a spoon. This step is where the magic begins, transforming fresh fruit into a complex flavor foundation.
🔥 Step 2: Add Heat and Aromatics
While the papaya mixture simmers, carefully add the 4 seeded Scotch Bonnet peppers (cut into quarters for easier blending later) and 2 minced garlic cloves. Let everything cook together for another 5-7 minutes until the peppers soften slightly but still retain their shape. The peppers should infuse the mixture with their signature heat without turning it into a puree.
I press down gently on the peppers with a wooden spoon during the first minute—this prevents them from floating and ensures even heat distribution. You'll smell that wonderful combination of tropical fruit and fiery pepper developing. Don't walk away; garlic burns in seconds. When the mixture smells aromatic and slightly spicy, it's ready for the next step.
👨🍳 Step 3: Balance Sweet, Sour, and Spicy
Remove the saucepan from heat and let the mixture cool slightly for 5 minutes. This cooling period is crucial—it prevents the sugar from caramelizing prematurely when we add it. While cooling, stir in the 0.25 cup of granulated sugar, 0.25 cup of fresh lime juice, 1 teaspoon of salt, and 0.5 teaspoon of cayenne pepper. The sugar will help balance the acidity of the vinegar and lime while complementing the natural sweetness of the papaya.
Here's where it gets fun—taste as you go. You want a perfect balance where the sweetness of the papaya and sugar shines through, the acidity from the vinegar and lime brightens the palette, and the heat from the Scotch Bonnets and cayenne builds gradually. If it needs more heat, add a pinch more cayenne. If it's too sweet, add a splash more lime juice. This is your chance to customize the heat level to your preference.
🥘 Step 4: Blend to Silky Perfection
Transfer the cooled mixture to a blender or food processor. Add the 1 tablespoon of extra-virgin olive oil—this creates that luxurious, glossy finish we're after. Blend until completely smooth, scraping down the sides as needed. The sauce should be vibrant orange with a beautiful sheen from the olive oil. If you prefer some texture, blend for just 20-30 seconds instead of completely smooth.
Here's the moment that matters: taste your creation. The sauce should coat your tongue with sweet papaya, a bright citrus tang, and a gradual build of heat that lingers pleasantly. If it's too thick, add 1-2 tablespoons of water to reach your desired consistency. If it's too thin, simmer uncovered for another 5 minutes to reduce. The perfect hot sauce should be thick enough to coat the back of a spoon but still pour smoothly.
⏰ Step 5: Rest and Store for Maximum Flavor
Transfer the blended sauce to a clean glass jar or bottle with an airtight lid. Let it rest at room temperature for at least 1 hour before refrigerating. This resting period allows all the flavors to meld together and the heat to develop fully. The longer it sits (up to 48 hours), the more complex and balanced the flavors become.
Once cooled, store in the refrigerator where it will keep for up to 3 months. The flavors actually improve over time, so don't be afraid to make extra. This tropical hot sauce pairs beautifully with grilled meats, seafood, or even as a zesty addition to cocktails. Just remember—what starts as a simple blend of fruit and fire becomes something extraordinary when given time to develop its full character.
Pro Tips For Making Aruba Papaya Hot Sauce
- REMOVE SEEDS FROM PEPPERS: Cut open Scotch bonnets lengthwise and scrape out the membrane and seeds with a spoon—not your fingers. That white stuff is where most of the capsaicin lives, and you don’t want your sauce to taste like a fire alarm went off in your mouth. (Yes, I’ve learned this the hard way.)
- BLEND WITH LIQUID FIRST: Add ¼ cup of the vinegar or pineapple juice to the blender before tossing in the papaya and peppers. This keeps the motor from overheating and makes it easier to blend—no pulsing required. I used to ignore this and ended up with a half-blended, half-chunky mess.
- STRAIN IF YOU WANT SMOOTH: Run the blended sauce through a fine-mesh strainer if you’re serving it at a fancy gathering. The texture will be silky, and you’ll avoid any unexpected papaya seeds in each bite. (I skip this for home use—chunky is fine, but I’ve had guests who hate surprises.)
- LET IT REST 20 MINUTES: Pour the sauce into a jar and let it sit before tasting. The flavors meld better, and the heat mellows out just enough to balance the sweetness. I used to taste it immediately and always thought it needed more lime—turns out, patience fixes that.
Make-ahead tips for leftovers
Fermentation Prep
Start your sauce early! The papaya and vinegar mixture needs 24 hours of refrigeration before blending to develop its tangy depth. Place the cooked papaya-vinegar blend in an airtight container and refrigerate immediately after cooking.
This step mimics traditional fermentation techniques used in Caribbean hot sauces, where acidity helps preserve flavors while building complexity. I like to label my container with the date—this helps track the 3-day minimum resting period before using. 🌱
Batch Size Tips
Double or halve this recipe with confidence—the sauce scales perfectly. For large batches, use a slow cooker on low for 2 hours instead of stovetop simmering to maintain even heat. When storing extra, divide into 4-ounce portions in small jars for easy single-use access.
Freeze extras in ice cube trays for perfect single-serving portions—just thaw overnight in the fridge. This works especially well for gift-giving or restaurant portions.
Heat Adjustments
Want milder heat? Remove half the Scotch bonnet seeds before cooking, or substitute 1 habanero pepper for 2 Scotch bonnets. For extra heat, add ¼ tsp of Penzeys Trinidad Scorpion Pepper sauce (about 150,000 SHU) to the blended sauce.
Always taste as you go—heat builds during storage, so start conservative. I keep a small bowl of plain yogurt nearby when testing heat levels—it's the perfect palate cleanser. 🌶️
Flavor Development
The magic happens during storage. After 7 days, the sauce develops a deeper, more complex flavor profile as the vinegar mellows and the fruit sugars caramelize slightly. For maximum depth, let it rest for 2-3 weeks—this is when the true Aruban character emerges.
I notice the citrus notes become more pronounced and the heat mellows into a smooth, lingering warmth. The color also deepens from bright orange to a rich amber, signaling peak flavor development.
Gifting Guide
Package your hot sauce in amber glass bottles (like Weck jars) to protect it from light degradation. Add a handwritten tag with usage suggestions: "Perfect for seafood, grilled meats, or tropical cocktails." For extra presentation, attach a small wooden spoon or a mini lime wedge.
I've found that people appreciate the thoughtfulness—especially when you include a note about the 3-month shelf life and refrigeration requirements. This makes your homemade sauce feel like a premium product worthy of gifting.
Reheating Leftovers
Never reheat this sauce directly—it's designed to be used cold or at room temperature. If you've stored it in the fridge and want to use it immediately, simply remove the jar 30 minutes before serving to let it come to a more comfortable drinking temperature. For thicker applications (like dipping sauces), you can gently warm 1-2 tablespoons in a small saucepan over low heat for 30 seconds**—just enough to make it pourable without altering the flavors. Always return unused portions to the fridge immediately.
Nutrition facts
Frequently asked questions
Can I substitute Scotch bonnet peppers with other hot peppers?
Yes! For milder heat, use habanero peppers (remove seeds for less spice). For extra heat, try ghost peppers (start with 1/4 pepper). Always taste as you go—the heat builds during storage, so begin conservative. Keep plain yogurt nearby for testing!
How long does this hot sauce keep, and can I freeze it?
Store in the fridge for up to 3 months in an airtight glass jar. For freezing, portion into ice cube trays—thaw overnight in the fridge. The flavors actually improve over time, especially after 2-3 weeks when the vinegar mellows and sugars caramelize slightly.
What's the best way to use this sauce beyond grilling?
Drizzle over tacos, ceviche, or grilled shrimp for instant tropical heat. Mix 1 tsp into cocktails (like piña coladas) for a spicy-sweet kick. Even dip fries or pretzels in it—just start with small amounts! The pineapple and lime make it surprisingly versatile for both savory and slightly sweet dishes.
Why does my sauce look cloudy after blending?
Cloudiness comes from natural fruit enzymes. For a clearer sauce, strain through a fine-mesh sieve after blending. If you prefer texture, skip straining—the cloudy version has more body and depth. The cloudiness won't affect flavor or safety, just appearance.
Can I make this sauce without vinegar?
Vinegar is essential for both preservation and flavor development. However, you could replace it with apple cider vinegar (though it adds sweetness) or lemon juice (but the sauce will ferment differently and last only 2 weeks in the fridge). The vinegar's acidity balances the sweetness and extends shelf life.